Installing a ceiling fan can do a lot for the comfort and enjoyment of your home. Chances are you’re aware of its many benefits, and now you’re ready to install a ceiling fan, or maybe replace a broken or outdated one. Whatever your situation, let’s take a look at how to go about installing a new ceiling fan with a light.
Replace an existing fan/light
If you already have an existing ceiling fan installed, your job is generally straightforward. While you have to remove the old fan assembly and light kit, you should be able to use the existing light box, ceiling fan wiring and be reasonably certain that your ceiling can support a ceiling fan.
Start by removing the fan blades one at a time. If the old ceiling fan has a light kit, remove any globes and of course, the light bulbs. Next, you need to unscrew the light kit itself. This is only the portion where the light bulbs screw into. You should be able to find two screws holding this part on. Undo them as you carefully steady the light kit with a second hand. When the screws are out, gently pull the light kit down to where you see the attached wiring. Undo this wiring by twisting off any wire nuts. Bring down and set aside the light kit.
You should now only have the ceiling fan assembly (motor) attached to the ceiling. It may be flush or it may have a downrod, which extends the ceiling fan down. Here, you should find four screws. Two will be holding down what’s called a canopy (cover) and the other two secure the top of the fan assembly to the actual mounting bracket. Undo all these screws. You can temporarily hang the fan assembly on the mounting bracket hook while you undo the wiring here.
At this point, the hardest part is over. Installing your new fan should more or less just be the opposite of what you did to remove your old fan and light kit. Remember to connect the wiring the same way.
Installing ceiling fan in place of light
We’ll assume you have a room with a light already overhead, and now you want to swap it out with a new ceiling fan. After you’ve ensured the power is off to this room, remove any globe or light fixture cover, simply take out the mounting screws of your old light. Untwist wires and bring down your fixture.
Unfortunately, unless your house was built to accommodate a ceiling fan in this spot, you’ll need to upgrade both the support and light box here for your new ceiling fan.
Let’s first find out if your old fixture’s light box was screwed directly underneath a joist, i.e. the hole in the ceiling is right on a joist, you’ll have a “pancake” light box up there. This will need to be replaced with a thin style fan-rated fox.This is very simple as all you’re doing is unscrewing the old (most likely made of plastic) and screwing in the new ceiling fan box (made of metal).
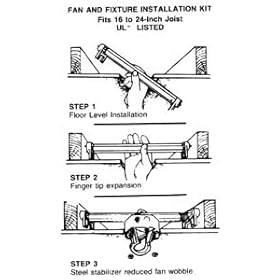
If the hole in your ceiling is not directly below a ceiling joist, then you’ll need to install a ceiling fan brace made for fan lights. Without this, your ceiling fan could fall down! First, remove the old electrical box that’s in your ceiling by hammering up on it with a piece of wood, ex. something about 6″ x 2″. The idea is to dislodge it. It’s fine if it gets stuck up in the ceiling once you’ve hammered it up and out of the way.
Now you can install your ceiling fan brace. If you can get in the attic above, this will be easy. Just follow the directions for the brace you purchased–one like this will do. If you can’t access the area from above, then you’ll need to slip the brace in through the hole and spread it a part. Working like a shower rod, you can twist it so it expands into the framing joists. Again, follow the instructions on the product you purchased.
If the ceiling fan brace you buy doesn’t come with one, you’ll need a ceiling fan-rate electrical box for your ceiling fan installation. You’ll want to attach this to the brace you put in, running the wiring through it.
Now, attach your ceiling fan mounting plate using the provided nuts and bolts, and run the wires down through that. When you attach your new fan, be sure to follow your particular ceiling fan directions closely.
Some basic hints:
- Decide if you want to use the downrod. As long as your fan blades are at least 7′ from the floor, you may not need the downrod. Know though, that the closer the fan is to the ceiling the less effective it can be.
- Be sure to use the metal hooks on the mounting plate to rest the fan assembly on while you wire your ceiling fan.
- In general, connect bare copper wires (ground) to copper or green color wires. Black (hot, lead) wires connect to black wires, and also to blue or striped wires if your ceiling fan comes with a light kit. White wires connect to each other and are the neutral or house wires. If you have a three-way wiring setup, connect black to black, white to white and blue to red. This will let you control your ceiling fan separately from the ceiling fan light.

